Top 10 Tips for Contouring a Round Face Step by Step

Time:2026-09-25 Author:Liam
0%

A round face has soft curves, balanced proportions, and plenty of natural character. Contouring should enhance those features, not disguise them. The goal is gentle definition: a little shadow beneath the cheekbones, warmth near the temples, and light placed where you want the eye to land. There is no single perfect map. Your bone structure, skin tone, and preferred finish all matter.

This guide explains how to contour a round face step by step, using practical techniques and easy-to-blend products. Makeup artist Bobbi Brown has said, “I believe all women are pretty without makeup—and can be pretty powerful with the right makeup.” That idea suits contouring well: makeup can support your choices without setting rules for your face. You’ll learn where to place contour, how to choose a natural shade, and how to soften edges with a brush or damp sponge. Work in thin layers. Check your makeup in daylight. A stripe that looks subtle under a bathroom bulb may appear muddy near a window. It happens. If one side looks stronger, blend before adding more product; perfect symmetry is not required. The steps ahead offer a flexible starting point, not a test. Adjust the placement, keep the pressure light, and stop when the result feels like you.
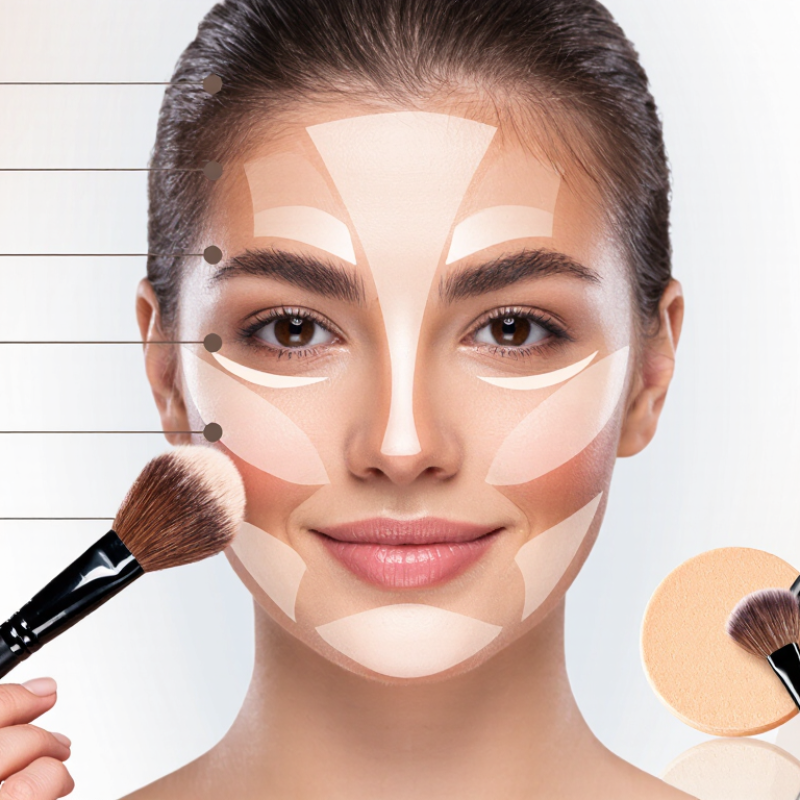
Top 10 Tips for Contouring a Round Face Step by Step

Identify Round Face Features and Set Contouring Goals

Stand in soft, even light and look straight into a mirror. A round face often has similar width and length, full cheeks, and a gently curved jawline. These are clues, not strict rules; many faces combine several shapes. Notice where your cheekbones sit and where your face looks widest. Turn slightly to each side, too. Shadows can make one cheek appear more prominent than the other. Start with observation. A quick phone photo in natural light can help, but avoid judging your face from one angle alone.

Set a specific goal before applying contour. You might want subtle definition beneath the cheekbones, a softer-looking jaw, or a little dimension near the temples. You do not need to make your face look narrower everywhere. Mark the areas you want to shade, then identify where you want light to remain, such as the center of the forehead or chin. Keep the plan gentle: a small amount of product is easier to blend than a dark stripe. I sometimes find my first placement looks uneven, even after careful mapping. Step back from the mirror and reassess before adding more.

Top 10 Tips for Contouring a Round Face

Identify round-face features and set contouring goals with this step-by-step guide.

The chart groups the ten guide steps by purpose. Counts reflect the organization of this guide, not measured beauty outcomes. For a round face, the steps emphasize identifying facial features, placing contour thoughtfully, and blending for a balanced finish.

Choose Contour Shades and Tools for Your Skin Type

For a round face, contour should add gentle definition without creating a hard stripe. Choose a shade about one or two tones deeper than your skin, with a similar undertone. Cool or neutral shades often look like natural shadow; very warm shades can read orange. Check the color along your jaw in daylight, not only under store lighting.

Tip: Match the formula to your skin. Cream contour often blends comfortably over dry skin, while powder can feel easier to control on oily skin. If your skin is sensitive, check the ingredient list and test a small area first. Use a soft, angled brush for powder or a damp sponge for cream. Keep tools clean, since leftover product can make blending patchy.

Place a small amount beneath the cheekbones, starting near the ear and stopping before the center of the cheek. Blend upward, toward the temples, using light strokes. For a round face, a little shading at the sides of the forehead and beneath the jaw may add balance; avoid drawing a dark line around the whole face. Less is enough. I used to keep adding product when the shape looked unclear, but that usually made the edges harder to soften. Step back from the mirror, check both sides, and adjust only where needed.

Top 10 Tips for Contouring a Round Face Step by Step — Choose Contour Shades and Tools for Your Skin Type
Step Tip How to Apply Shade and Finish Tool and Skin-Type Notes
1 Start with a comfortable, even base Apply skincare and complexion products first, then let them settle before contouring. Use a light layer so contour products blend without disturbing the base. Choose complexion products that match your skin depth and undertone; contour should look like a soft natural shadow. For dry skin, moisturize well and consider cream formulas. For oily skin, use thin layers and a long-wear base.
2 Choose a suitable contour shade Test the shade along the jaw or cheek area in natural light. It should deepen the area subtly without looking like a stripe. A neutral or slightly cool-toned shade often mimics shadow. Start around one to two shades deeper than your skin tone; adjust for your complexion and preference. Powder is easy to build gradually; cream or liquid can give a seamless, skin-like effect when blended well.
3 Select a tool for the formula Use a small, fluffy brush for powder or a damp sponge or dense synthetic brush for cream and liquid. Pick up a small amount at a time. Use a matte or low-shine contour product; shimmer reflects light and is generally better suited to highlighting. Soft brushes can help avoid harsh edges. Clean tools regularly, especially if you have blemish-prone skin.
4 Map the cheek area gently Feel for the hollow beneath the cheekbone, then place contour just below it, starting near the ear and blending toward the center of the cheek. Stop well before the mouth. Keep the deepest color near the hairline or ear and use less product as you move inward. A small angled brush offers control; a sponge works well for diffusing cream edges.
5 Blend upward and outward Blend the cheek contour toward the temples and upper cheek rather than dragging it downward. Soften any visible lines with a clean brush or sponge. Build in thin layers. A softer edge usually looks more natural than a sharply defined stripe. For dry or textured skin, use gentle tapping motions with cream products. For oily skin, set lightly with powder if needed.
6 Add subtle definition at the temples Apply a small amount along the temples and near the hairline, then blend into the hairline so there is no distinct border. Use the same contour shade as the cheeks, or a lighter application for a balanced result. A fluffy brush helps distribute powder evenly; use a sponge or brush to sheer out cream products.
7 Define the jaw only where desired Apply a light trace beneath the jawline and blend downward onto the neck. Keep the application subtle and check both sides in even lighting. Choose a shade that blends naturally with the neck; avoid a dark line directly on the jaw. Use a soft brush for powder or a lightly loaded sponge for cream. Skip or reduce this step if it looks heavy.
8 Keep nose contour optional and delicate If desired, place two faint lines along the sides of the nose and blend until barely visible. Avoid drawing strong lines across the tip. Use a small amount of a neutral shade close to your cheek contour color. A small blending brush gives precision. Powder can be easier to control for beginners.
9 Balance with highlight and blush Place a light-reflecting product on selected high points, such as the tops of the cheekbones. Apply blush to the cheeks and blend its edges into the contour. Use a highlight shade that suits your skin depth; avoid placing strong shimmer over areas you prefer to keep less prominent. Cream blush can layer well over cream products; powder blush is often easiest over a set base.
10 Check, soften, and set as needed Look at the makeup in natural or evenly lit light. Blend any harsh edges, compare both sides, and set only areas that need extra wear or oil control. Keep the final effect softly defined rather than sharply striped. Add product gradually instead of trying to correct too much at once. Dry skin may need little or no setting powder; oily skin may prefer a light dusting of translucent powder in the T-zone.

Map the Key Contour and Highlight Areas

Start with a relaxed face and soft, even lighting. Look straight into a mirror; avoid lifting your chin. For a round face, place contour just beneath the cheekbones, beginning near the ears and stopping before the outer edge of the iris. Sweep a little along the temples and the sides of the jaw. Keep the center of the face bright. A narrow highlight down the nose and a small touch on the chin can add gentle definition without drawing a hard line.

Tips: Use a cool or neutral contour shade, only a little deeper than your skin. Tap it on in thin layers. Blend upward on the cheeks, not down toward the mouth. Place highlight on the tops of the cheekbones and the center of the forehead. Check both sides in daylight. Faces are rarely perfectly symmetrical, so matching every mark can look less natural.

Circana’s 2023 U.S. prestige beauty report recorded 9% growth in makeup sales. That figure describes the market, not proof that contouring changes facial shape. Treat placement as a visual guide, not a rule. Cream products can leave sharper edges; powder often looks softer, but may cling to dry patches. If the result feels too sculpted, soften the cheek edge with a clean brush. A little unevenness may remain. That is normal.

Apply and Blend Contour to Add Definition

Start with clean, moisturized skin, then apply your usual base makeup. Choose a contour shade only a little deeper than your skin tone; a very dark stripe can look harsh in daylight. Use a small amount beneath the cheekbones, beginning near the ear and stopping before the middle of the cheek. Keep the line slightly angled toward the corner of your mouth, but do not bring it too far forward. A light touch helps preserve a soft, natural finish.

Blend upward with a small brush or damp sponge, using short strokes toward the temples. Keep the product close to the hairline and jaw, then soften every visible edge. Check both sides in natural light. They may not look perfectly identical, and that is normal. If one side appears stronger, tap over it with a clean sponge rather than adding more product everywhere. Less is often easier to correct. Add a little contour gradually, especially if your skin is dry or textured, since extra layers can catch on uneven areas. I still find that one cheek sometimes needs more blending than the other; pause, step back from the mirror, and adjust only where the shadow looks too sharp.

Balance Blush and Highlights for a Natural Finish

For a round face, contour looks most natural when blush and highlight add balance rather than extra stripes. Sweep a muted blush lightly across the upper cheeks, blending toward the temples. Keep the color above the hollow of the cheek; placing it too low can make the face look heavier. Use a small amount, then check both sides in daylight. Less is enough.

Apply highlight sparingly to the tops of the cheekbones, where light naturally catches. A soft sheen usually looks more realistic than visible shimmer, especially in close daylight. Add a touch to the inner corners of the eyes or the bridge of the nose only if those areas suit your features. Avoid drawing a bright line across the full cheek, which can compete with blush and contour. Blend the edges with a clean brush or fingertip.

Work in thin layers and pause between them. Makeup can look balanced in a bathroom mirror but too strong near a window; that mismatch is easy to miss. If blush and highlight blur together, soften the border with a little uncolored powder or a clean brush. Faces are not perfectly symmetrical, so matching every stroke exactly may look less natural than adjusting each side gently.

FAQS

What features may suggest a round face?

The face may have similar width and length, full cheeks, and a gently curved jaw. These are clues, not fixed rules.

How can I check my face shape more accurately?

Look straight into a mirror under soft, even light. Turn slightly and notice where your face looks widest. One angle can mislead.

Where should contour go on a round face?

Sweep a small amount just beneath the cheekbones, starting near the ears. Stop before the outer edge of the iris. Blend upward.

Where can I add contour for gentle definition?

Apply a little near the temples and along the sides of the jaw. Keep the layers thin. Dark stripes can look harsh.

Where should I place highlight?

Try the cheekbone tops, center of the forehead, and a narrow line down the nose. A small touch on the chin can also add dimension.

Which contour shade and texture may work well?

Choose a cool or neutral shade slightly deeper than your skin. Cream can leave sharper edges; powder may look softer but cling to dry patches.

What should I do if the contour looks too strong?

Soften the cheek edge with a clean brush, then step back from the mirror. I may still see unevenness up close. That can be normal.

Should both sides look exactly the same?

Not necessarily. Faces are rarely perfectly symmetrical, and matching every mark may look less natural. Check the result in daylight.

Conclusion

This guide to how to contour a round face step by step begins by identifying the face’s naturally soft curves and setting a goal to create subtle definition without changing its character. It explains how to choose contour shades and tools suited to your skin type, then map where to place contour and highlight for a balanced effect.

Next, the guide walks through applying and blending contour gradually along key areas, keeping edges soft and the finish natural. It also shows how to balance blush and highlights so they complement the contours rather than compete with them. By following each step and adjusting the intensity to suit your features, you can create a polished look that feels comfortable and flattering.

Liam

Liam

Liam is a dedicated marketing professional with a profound expertise in the industry, where he excels at highlighting the unique advantages of our core products. With a keen understanding of market trends and consumer needs, Liam frequently updates our company’s professional blog, providing......